Planning a bathroom renovation? Get a Quote
Project Case Study — Bathroom Renovation · Newcomb, Geelong

Not Just New Tiles. A Completely New Bathroom.

The family didn't want another cosmetic update — they wanted a bathroom built around the way they live. The old space felt cramped, outdated, and impractical, with one basin shared between two people. We stripped it back to the frame and created a modern bathroom that looks better, works better, and is built to last.

Location
Newcomb, Geelong VIC
Duration
2 Weeks (est.)
Crew
2 Tradespeople
Scope
Full Strip-Out & Rebuild
Completed in 2 Weeks
Floor-to-Ceiling Calacatta Tile
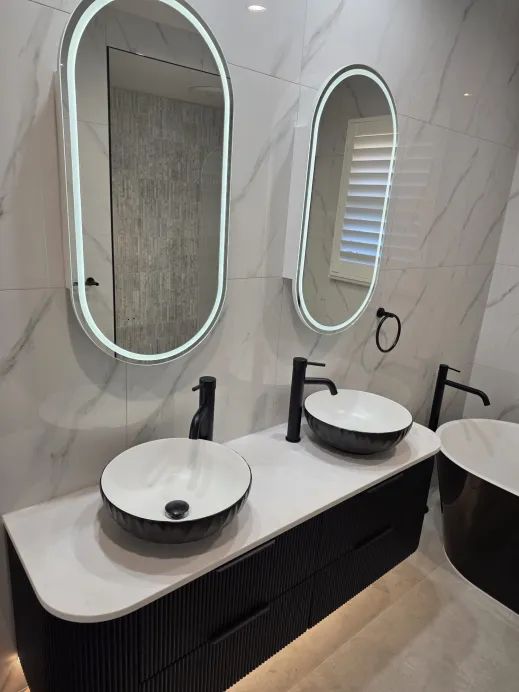
Custom Fluted Vanity with LED Underglow
Twin Black Vessel Basins
Matte Black Throughout
Frameless Shower Screen
Backlit LED Mirrors
Project Snapshot
ProjectFull Bathroom Renovation
LocationNewcomb, Geelong, Victoria
PropertyResidential
Duration2 weeks (estimated, based on scope)
Team2 Tradespeople
StyleBold monochrome — black fixtures throughout, Calacatta marble tile
Key FeaturesFloor-to-ceiling Calacatta marble-look tile, fluted black floating vanity with LED underglow, twin black vessel basins, black freestanding bath, matte black tapware and accessories throughout, frameless shower screen
The Challenge

The Challenge

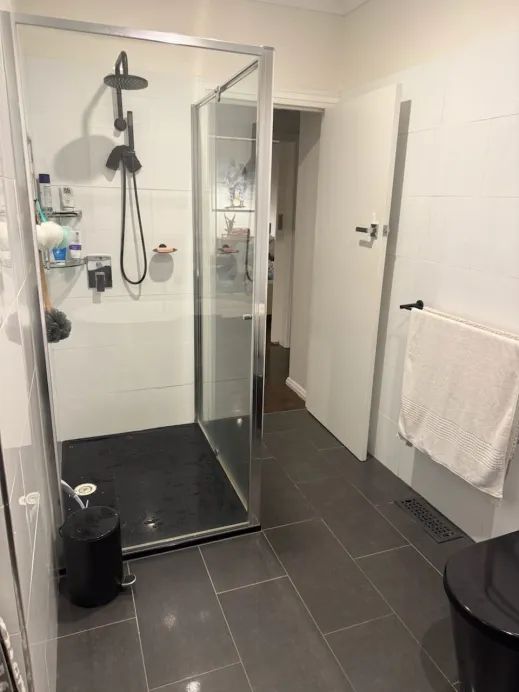
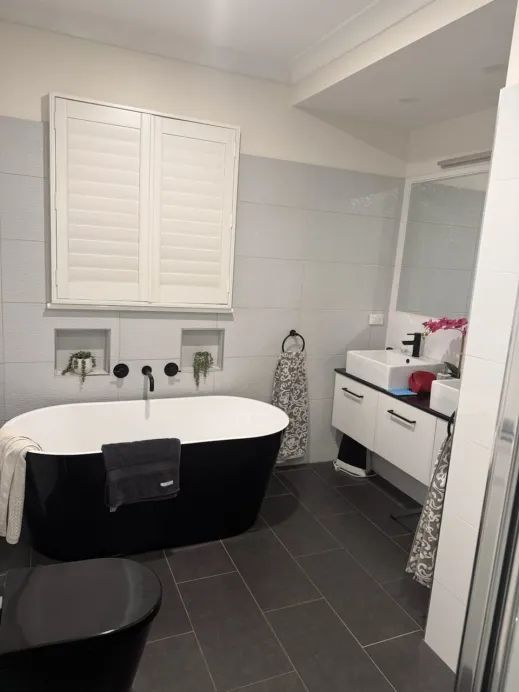
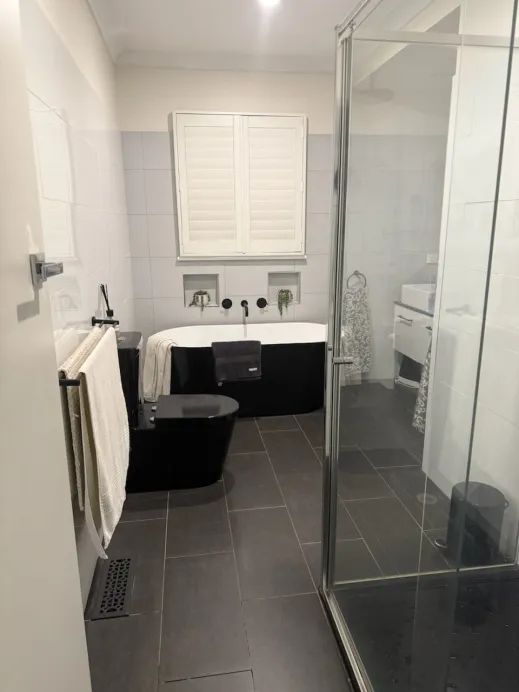
The existing bathroom had made some decisions — dark floor tiles, a black bath, black fittings. You could see what it was going for. But it stopped halfway. Wall tiles that ended midway up. One basin between two people. A single overhead light that made the whole room feel smaller and dimmer than it actually was.

They'd thought about doing less. A new vanity, different tapware — a refresh without the disruption. The problem was the plumbing wasn't in the right spot for a double vanity, and you can't solve that by choosing nicer taps. The electrical was only set up for one overhead fitting, so any lighting upgrade would still start from the same wrong place.

Once you've found those kinds of problems, the conversation changes. Going back to the frame and fixing them properly costs more than a patch job on the surface, but the gap isn't as wide as most people expect — and the result is completely different. For our Geelong bathroom renovations, this is the brief we find clearest to work with. Everything comes out. Every decision gets made fresh.

Existing Newcomb bathroom before renovation — black bath, dark floor tiles and partial wall tiling
Existing bathroom
Existing shower zone with partial wall tiles and a framed screen
Shower zone
💡
Expert Tip

Tiling over existing walls saves money on demo day. It costs more in the long run if the substrate moves or traps moisture — and in an older bathroom, it often does. If you're planning a high-end finish, the tile is only as good as what's behind it. Strip out, fix what needs fixing, then tile over something solid.

The Solution

The Solution

Layout & Planning

Everything came out — tiles, walls, floor, the lot. Back to bare frame and slab. The vanity position was marked up on the framing before any pipes were run, so we knew exactly where everything needed to land. The bath and shower zones were planned at the same stage. Doing that sequencing right is what stops the finished room from feeling like everything was worked out as you went. Two people can get ready at the same time now, which is probably the most practical change in this bathroom.

Plumbing & Electrical

New plumbing ran to the vanity's new position and to the bath. The electrical was completely updated — recessed downlights replacing the single overhead fitting, circuits for the LED mirrors, and an outlet for the under-vanity strip. All of it done while the walls were still open. Closing walls over wrong plumbing or insufficient electrical is how you create expensive problems later.

The waterproofing membrane went on before tiling — over the floor, up the walls of the wet zones, into the corners and junctions where water tends to find a way through. You can't add it later. Once the tile is on, the membrane either did its job or it didn't.

Tile Selection

Calacatta marble-look porcelain, large format, floor to ceiling on every wall and inside the shower. Large format means fewer grout lines — a standard-sized tile in the same pattern would have three times as many. Over a few years, that's a real difference in how often you're on your knees with a grout brush.

The floor is a slightly different tile — same palette, less veining, more uniform. It sits in the same family as the walls without competing with them, and the distinction is enough that you know where the floor ends and the wall starts. Choosing the right tile for each surface is its own decision, not just finding one you like and using it everywhere.

Custom Joinery

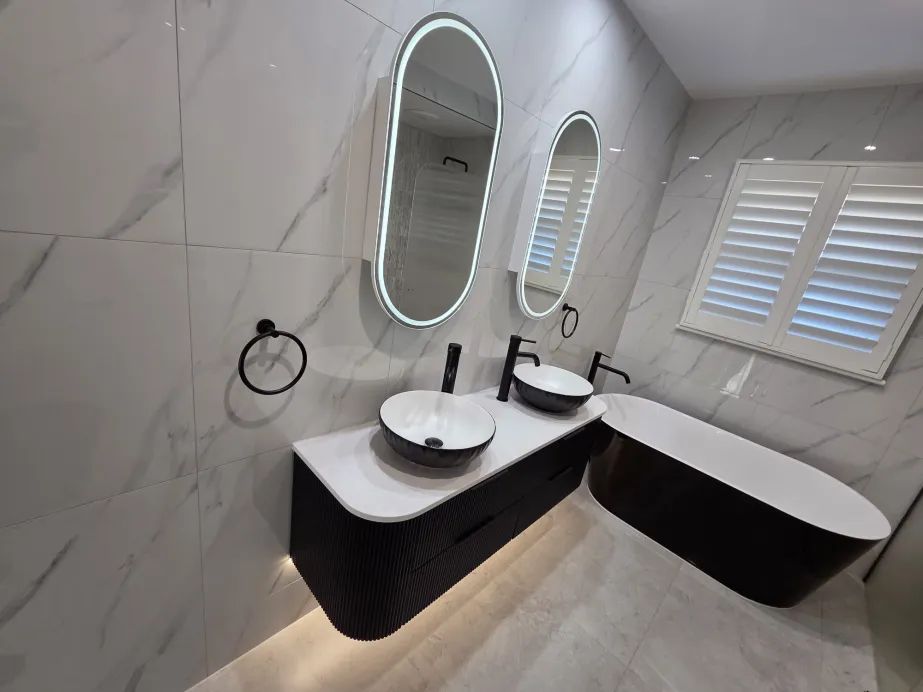
The vanity is custom — a floating black unit with fluted drawer fronts, white stone top, two round black vessel basins. The fluted texture adds interest without adding a second colour, which is the same logic as the tile choice. Each person gets their own basin and their own drawers. That's not a small thing when two people are getting ready in the same bathroom at the same time every morning.

The LED strip under the vanity was planned from the beginning. It needs its own circuit and a channel set into the vanity carcass during fabrication — you can't retrofit it cleanly. When it's done right, you don't see the strip at all, just a warm glow at floor level that makes the vanity look like it's floating.

Lighting Design

Two oval backlit LED mirrors above the basins. The light comes from behind the mirror, wraps around the edge, and hits you at face level — exactly where you need it when you're getting ready. Most bathrooms rely on an overhead downlight for mirror lighting, which means you're working in your own shadow. That's not a fitting problem, it's a position problem, and the fix is to put light at face height rather than above it.

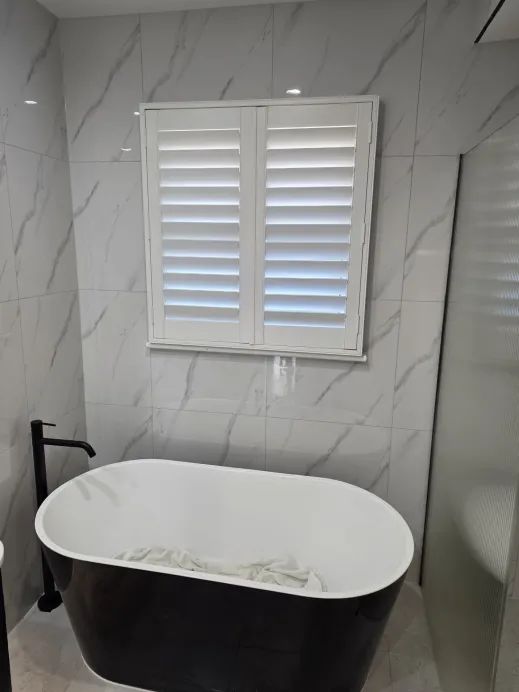
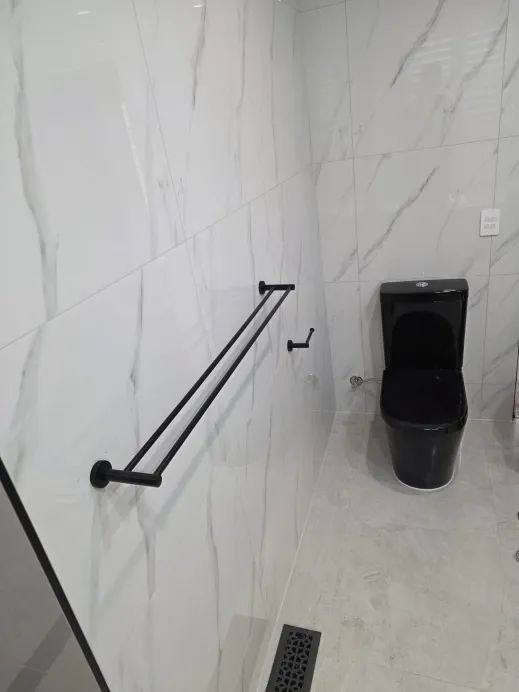
The freestanding bath sits against the marble wall with a matte black floor-mount tap. Every fitting in the room — towel rail, toilet roll holder, towel ring, flush button, drain covers — is matte black. Sourcing every category of fitting in the same finish takes more effort than it sounds, because the range available in matte black varies quite a bit across different suppliers. Getting it consistent required locking in those decisions early.

Why This Matters

In a bathroom with this kind of palette, one chrome toilet roll holder is all it takes to make the whole room look unfinished. Matte black throughout isn't an aesthetic obsession — it's the disciplined follow-through that makes everything else work.

Floor-to-ceiling Calacatta tile

Stopping tile halfway up the wall is usually a cost-saving decision that ends up defining how dated a bathroom looks ten years later. Running it all the way up removes the line where it stops and lets the marble pattern read as one complete surface. You can see the difference in the before photos — same room, same proportions, completely different feeling. If you're weighing up tile coverage for your own renovation, full height versus partial is often the call that makes the biggest difference.

Fluted vanity with LED underglow

A flat black vanity in front of a white marble wall would have been fine. The fluted texture gives the drawer fronts something to do — the ridges catch light differently depending on where you're standing, so the vanity has a presence that a flat panel doesn't. The LED underglow was built in during fabrication. You can't add it cleanly after the fact. When it's right, you see the effect, not the source.

Twin black vessel basins

White basins on a black vanity splits the unit into two separate visual layers. Black basins keep it as one thing. The tapware, the basins, the drain — all the same matte black — and the whole vanity reads as one deliberate object. Nothing on the bench looks like it was placed there; it all belongs.

Frameless shower screen

A framed screen puts a band of metal in front of the tile. In a bathroom where the tile is doing most of the visual work, that frame would compete with it. One panel of frameless glass lets the marble run uninterrupted from the floor to the top of the shower wall. It also gets rid of the aluminium tracks that collect soap scum around a framed screen, so it's genuinely easier to clean.

Black freestanding bath

White inside, black outside — the same logic as the basins. The inside is white because that's the surface you're actually in contact with. The outside is black because a white bath against white marble walls would have been invisible. This one holds its own against the tile without trying to compete with the vanity.
ℹ️
Did You Know?

Matte black hides water marks better than polished chrome — the dull surface doesn't show spots the way a reflective one does. The trade-off is that the finish scratches from abrasive cleaners, so you need to use gentle products. It's a fair deal for most households and a genuine advantage over chrome if you'd rather not wipe down your tapware every other day.

  • Full strip-out back to frame and slab
  • New plumbing — double vanity, bath, shower
  • Electrical — LED mirrors, recessed downlights
  • Waterproofing membrane before tiling
  • Calacatta marble-look tile, floor to ceiling
  • Custom fluted black floating vanity with LED strip
  • Twin black vessel basins, matte black tapware
  • Two oval backlit LED mirrors
  • Black freestanding bath, matte black tap
  • All-black toilet, frameless shower, full matte black accessories
Before & After

Before & After

The before bathroom had some things going for it — dark floor tiles, a black bath, black fittings. Someone had thought about it. But the wall tiles stopped at shoulder height, there was one basin for two people, and one overhead light made the whole room feel flatter and smaller than it was. The slider below shows both.

Layout. Single vanity with one basin — double floating vanity, a basin and drawers each. The bath moved to sit properly against the tiled wall rather than wherever the original plumbing put it. The shower is defined by the tile contrast now, not by a heavy framed screen.

Lighting. One ceiling fitting — recessed downlights across the ceiling, backlit LED mirrors at face height above each basin, LED strip under the vanity. Three sources, each doing something different.

Storage. One cluttered bench — two sets of drawers and a stone top with actual space on it, because the things that used to live on the bench now have somewhere else to go.

Finishes. Mixed chrome and black, wall tiles that stopped mid-wall and drew your eye straight to the line where they ended — Calacatta marble from floor to ceiling, matte black on every single fitting, nothing interrupting the surface.

Day to day. The original bathroom worked fine. This one is genuinely pleasant to be in — and faster to clean, because large-format tile has far fewer grout lines than a standard-sized tile does.

Before — existing Newcomb bathroom, black bath and vanity Before
Before — existing bathroom with white vanity and dark floor tiles Before
Before — existing shower zone and framed screen Before
Finished Newcomb bathroom with Calacatta marble tile and black fluted vanity Original Newcomb bathroom before renovation Before After
Drag the slider to compare

Like what you see so far? We can do this for your bathroom too.

Get a Free Quote →
Why This Bathroom Works

Why This Bathroom Works

High-contrast bathrooms — all white and black, no softening timber or warm neutrals — are easy to get wrong. Too many elements competing, or one fitting that breaks the palette, and the room looks unfinished rather than bold. The reason this one works is simpler than it appears.

Two colours, nothing else. White marble tile and matte black fixtures, all the way through. No chrome, no timber, no accent colour. When the palette is this tight, the room looks like one decision — but it only holds together if you follow it through every fitting, including the ones no one thinks about, like the flush button and the drain cover.

The tile carries the room. Calacatta marble-look porcelain has bold grey veining that gives every wall movement and depth. Because the tile already provides that, the fixtures can be completely plain — round basins, simple oval mirrors — and the room still has something to look at. A plain white tile with the same fixtures would have needed other elements to add interest.

Light at the right height. Overhead downlights, backlit mirrors at face level, LED strip under the vanity. The mirror lighting specifically makes a difference every morning — face-height light versus ceiling light is the difference between a usable mirror and one you're squinting at.

Proportions that fit the space. The vanity fills the wall properly. The shower has room in it. The bath isn't wedged into a corner. Good proportions are harder to see in photos than good fittings, but they're what you feel every time you walk in.

🏡
Living With It

There's a version of this bathroom that looks great in a photo and is annoying to use — no storage, hard to clean, cold underfoot. This isn't that bathroom. The decisions that make it look the way it does are the same decisions that make it work for two people every day.

Video Walkthrough

See the finished bathroom in full

Photos show moments — the video shows the room as it actually feels to be in it.

What Homeowners Can Learn

What Homeowners Can Learn

Related Projects

Related Projects

FAQs

FAQs

Ultimate Renovations provides bathroom renovations across Geelong and the Bellarine, including plumbing, electrical, waterproofing and tiling.

Choose a local renovation company with a proven track record, written quotes, licensed trades and compliant waterproofing.

Bathroom renovations in Geelong typically start from $8,000, with most projects ranging from $15,000 to $35,000 depending on size, layout and finishes.

Most bathroom renovations take 3 to 5 weeks on site, depending on the project's size, complexity and material availability.

Yes, but only for a cosmetic refresh. A full bathroom renovation with new waterproofing and tiling typically starts from around $8,000.

Bathroom waterproofing is required by the National Construction Code and must comply with Australian Standard AS 3740 before tiling begins.

Most like-for-like bathroom renovations don't require a building permit. Structural changes or heritage properties may require approval.

Common upgrades include step-free showers, grab rails, non-slip flooring and comfort-height toilets to improve safety and accessibility.

Interested in something similar?

Your bathroom, your brief.

If this Newcomb renovation is the kind of result you're after — or if you have something different in mind entirely — we're happy to talk through what's realistic for your space and your budget. Our bathroom renovation services cover everything from a focused retile to a full strip-out and rebuild. No pressure, no obligation — just a straight conversation about what's involved.